

How to Measure a Dip Tube Length
Posted by Discount Vials - A BASCO Company on Aug 09, 2026
Selecting the correct dip tube length is essential for ensuring your sprayer, pump, or dispensing closure performs properly. A dip tube that is too long may bend or curl inside the bottle, while one that is too short can leave valuable product behind. Fortunately, measuring the correct dip tube length only takes a few simple steps. Whether you're packaging lotions, soaps, cleaners, oils, gels, sanitizers, or specialty liquids, the correct dip tube length improves the overall user experience.
Why Dip Tube Length Matters
The dip tube carries liquid from the bottom of the bottle to the dispensing closure. Proper sizing helps ensure:
- Consistent dispensing
- Minimal product waste
- Maximum product evacuation
- Smooth pump or sprayer performance
Step 1: Measure the Dip Tube Length
Dip tube length is measured from the top of the gasket located underneath the closure to the very end of the dip tube.
Always measure the entire assembled dip tube. Measuring only the visible plastic tube can result in an incorrect fit.
If you're replacing an existing sprayer or pump, remove it from the bottle and measure from the top of the gasket to the end of the tube. This is the most accurate way to match your current closure.
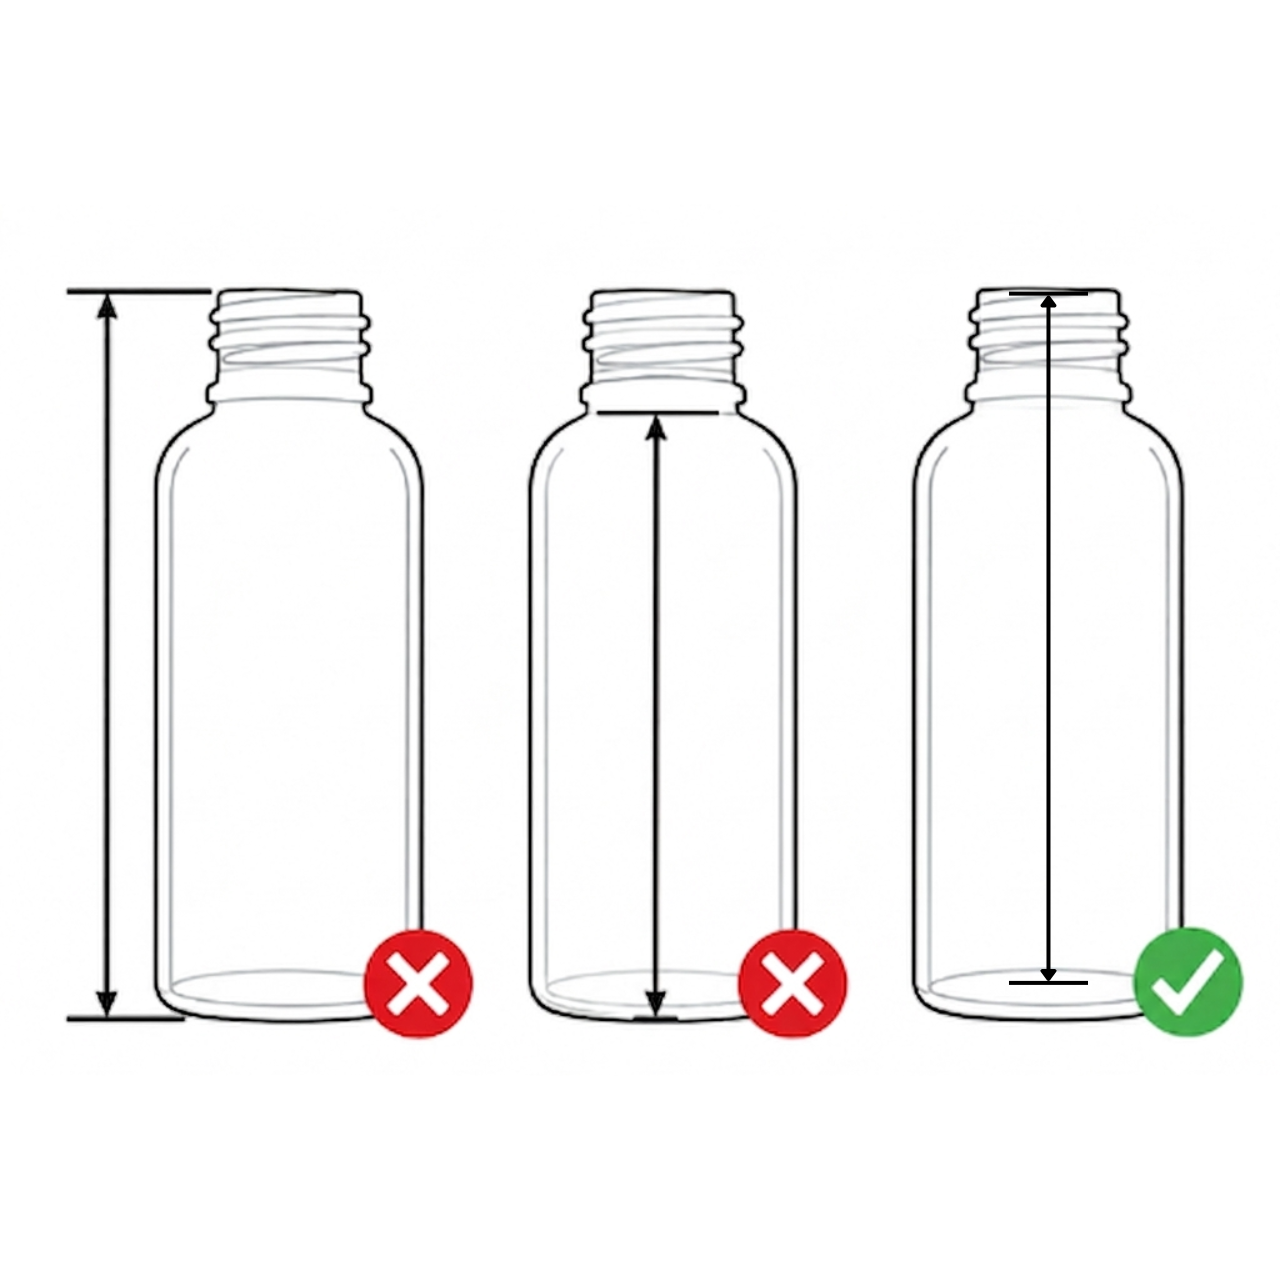
Step 2: Measure the Bottle HeightNext, measure the bottle from the top of the neck finish to the bottom of the bottle. Do not include the closure or cap in your measurement. For the most accurate measurement, place a ruler inside the bottle or refer to the bottle's technical specifications if available. Do not measure from the outside of the bottle, as wall thickness and base design can affect the measurement. Bottle height provides the reference needed to determine the correct dip tube length. Because bottles vary in shape and height, using the overall bottle height helps ensure the dip tube reaches the proper position inside the container. |
 |
Step 3: Determine the Best Dip Tube Position
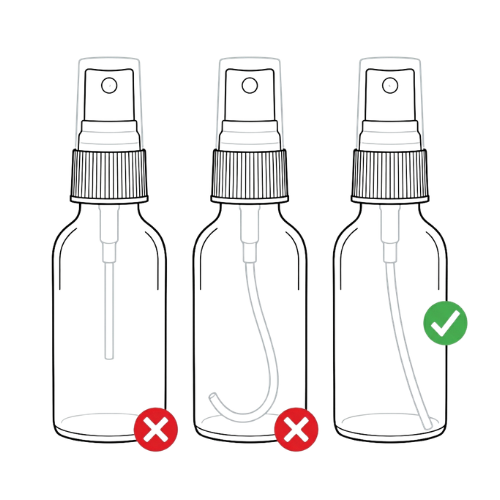
Most dip tubes should stop just short of the bottom of the bottle to prevent curling while allowing nearly all of the product to be dispensed. A common recommendation is to leave approximately 1–3 mm of clearance between the end of the dip tube and the bottom of the bottle.
|
Sprayers Fine mist sprayers typically use a thinner, more flexible dip tube. The tube should be long enough to gently curve toward the side of the bottle, allowing it to reach as much product as possible without becoming kinked. |
 |
|
Pumps Pumps generally use a more rigid dip tube. The tube should stop just above the bottom of the bottle, leaving a small amount of clearance so it doesn't sit flush against the base. This helps maintain consistent product flow while preventing blockage. |
 |
Step 4: Test the Fit
Before placing a large order or trimming multiple dip tubes, test one assembly with your bottle.
Verify that:
- The closure threads properly
- The tube reaches the product
- The pump or sprayer dispenses consistently
- The tube is not bent excessively or pressed against the bottom of the bottle
If necessary, trim the dip tube slightly and test again until you achieve the desired fit.
Need Help Choosing the Right Pump or Sprayer?
Finding the right dispensing closure is about more than matching the neck finish. The correct dip tube length helps ensure your product dispenses properly while minimizing waste and improving customer satisfaction.
At Discount Vials, we offer compatible bottles, pumps, sprayers, and dispensing closures designed to work together. If you need help selecting the right combination for your application, our packaging specialists are here to help. Browse our selection of dispensing losures, or contact us today if you have questions.
Need more help finding the right packaging? Explore more resources from Discount Vials.